Razorpay Curlec Knowledge Base

1. Welcome & Quick Start

About Razorpay Curlec

Razorpay Curlec is a full-stack payments solution that makes it easy for businesses of all sizes to collect payments, automate payouts and take control of their cash flow. It helps businesses accept online payments with a complete suite of tools covering bank transfers, cards, e-wallets, BNPL (Buy Now, Pay Later) and recurring payments. 

Whether you are running an online store, managing subscriptions or facilitating marketplace transactions, Razorpay provides the tools and infrastructure to handle payments at scale.

Quick Start Checklist

Demo Mode vs Live Mode

  • Demo Mode: Start integration immediately without KYC completion. Safe environment to test payments with dummy data. No real money involved. 
  • Live Mode: Requires KYC verification. Accept real customer payments. 

You can switch between both directly in the Dashboard.

2. Choose How You Want to Collect Payments

A. No-Code Tools

Perfect for businesses looking for a hassle-free way to start accepting payments without any technical setup. 

Payment Links

Share payment link via email, SMS, WhatsApp, Telegram, chatbot etc. and get paid immediately. Accepting payments from customers is now just a link away.

Best for:

  • Businesses Without Website
  • Social Media Sharing
  • Alternative Payment Options

How to Create Payment Links

  1. Log in to the Dashboard.
  2. Navigate to Payment Links.
  3. Click + Create Payment Link
  4. Enter the required customer details and create a payment link.
  5. Share the link to your customer.

Payment Pages

Create a simple branded webpage where customers can browse your offering and pay online. You do not need a website or an app to start accepting online payments from customers.

Best for:

  • Events and Tickets
  • Accepting Donations
  • Sell Products
  • Fee Collection

How to Create Payment Pages:

  1. Select Payment Page
  2. Add Page Details
    1. Add Business Details
    2. Add Payment Details
  3. Configure Payment Receipt
  4. Configure Page Settings
  5. Publish and Share
  6. Set Up Webhooks

Payment Buttons

Create payment buttons within minutes to start collecting online payments, fees and more. Many NGOs, SMEs, and freelancers are collecting payments by adding a payment button to their website on their own.

Best for:

  • Event Organisers
  • Fundraising
  • Small Businesses
  • Institutes

How to Create a Payment Button:

  1. Click Create Payment Button and select a template or create from scratch.
  2. Add button details.
  3. Paste button link on your website.

Invoices

Allows merchants to send GST/SST-compliant professional invoices with an embedded “Pay Now” button, allowing you to get paid instantly.

Best for:

  • SMEs
  • Freelance Services
  • Consulting Agencies

How to Create an Invoice:

  1. Create an Invoice from the Razorpay Dashboard
  2. Enter invoice details.
  3. Share the invoice to your customer.

B. E-commerce Store Integrations

If you operate on an e-commerce platform such as Shopify, WooCommerce, WordPress, Wix and more, you can integrate Razorpay Curlec directly to your store.

Shopify

Accept multiple payment methods instantly, including FPX, cards, GrabPay, Touch ‘n Go, Boost and BNPL.

How it works:

WooCommerce

Connect our checkout to accept local and international payment methods.

How it works

WordPress

Use Payment Pages or Buttons to accept payments without additional plugins.

How it works

  • Download the plugin from the WordPress Plugin Directory.
  • Activate the plugin by navigating to the Plugin section on WordPress
  • Configure your API keys
  • If you are using WooCommerce with your WordPress site, use the WooCommerce plugin.

C. Advanced Custom Integrations (API)

For businesses wanting full control of checkout, user journeys or custom applications.

When to choose this:

  • You have in-house developers
  • You need a tailored checkout
  • You are integrating payments into your app or platform.

Key steps:

  1. Retrieve API keys from Dashboard
  2. Integrate using our API documentation
  3. Test in demo mode
  4. Switch to live mode once ready

Developer support is available if you need guidance.

  1.  

3. Managing Your Business on the Dashboard

Your Dashboard is your control centre to monitor and manage your entire payment workflow.

Watch our step-by-step tutorial videos on how to fully utilize our dashboard.

1. Manage your Account and Settings and view your Merchant ID.

2. View current balance and business analytics via the home page

3. View and download reports for all activity

4. View settlement timelines

Funds are typically settled into your account within T+2 working days.

5. Manage transactions, refunds and any payments.

4. Automating Recurring Payments (Subscriptions)

You can automate monthly, quarterly or annual billing using Subscriptions.

Best for:

  • Gym memberships
  • Tuition fees
  • SaaS or digital services
  • Maintenance plans

How it works:

  1. Create a subscription plan
  2. Set pricing and billing cycle
  3. Add customers
  4. Payments get collected automatically

No manual reminders or chasing overdue payments.

5. Credit Card Installments

Razorpay Curlec Checkout supports installments on credit cards issued by major banks through Visa.

Installments are available by default on Razorpay Curlec Standard Checkout. No additional integration is needed. Merchants get the full amount upfront while offering additional payment flexibility to customers.

How it works:

  1. Customers go through the normal checkout process, selecting cards as their payment methods.
  2. If the card is eligible, they will see the installment options. If the card is not eligible, they can pay the full amount. 
  3. Eligibility is based on the list of supported payment partners and issuing bank’s criteria during the payment process.
  4. After successful payment, the merchant will receive the full amount upfront.

6. Going Live

How To Go Live

  1. Complete testing in demo mode
  2. Switch to Live Mode in Dashboard
  3. Use your live API keys (for integrations)
  4. Perform a real payment
  5. Track settlement

Checklist

  1. Product or service info is complete
  2. Bank details verified
  3. Payment method preferences set
  4. Checkout tested
  5. Refund flow tested (if applicable)

7. FAQs

Q: Do I need a developer to go live?

A: Not always. You can start with Payment Links, Pages or Buttons without any technical knowledge.


Q: Can I test before going live?

A: Yes. Demo mode is included for all merchants. No real money is charged.


Q: When will I receive my settlements?

A: Typically within T+2 working days. 

“T” is the day the transaction happens. “+2” means the funds will reach your bank account 2 working days later.

Example: If a customer pays you on Monday, the funds will settle on Wednesday.

Example: If a customer pays you on Friday, the funds will settle on Tuesday (since Saturday/Sunday are not working days).


Q: Which payment methods are supported?

A: We support credit & debit cards, international cards, bank transfers, BNPL (Atome), and E-Wallets (Touch ‘n Go, Boost, GrabPay). 


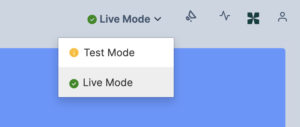
Q: How do I switch from testing to live mode?

A: You can switch between the Test and Live modes using the drop-down option at the top of the Dashboard.

Generate API keys in Live mode to use the API keys in Live mode.


Q: Are there any setup or annual fees?

A: No. Razorpay Curlec charges zero setup fees and zero annual maintenance fees for the standard plan. You only pay a small transaction fee when you successfully make a sale. You can view our pricing structure at curlec.com/pricing.


Q: Do I need a developer to use Invoices?

A: No. You can generate GST/SST-compliant invoices directly from our Dashboard, email them to your client, and track their payment status in real-time.